

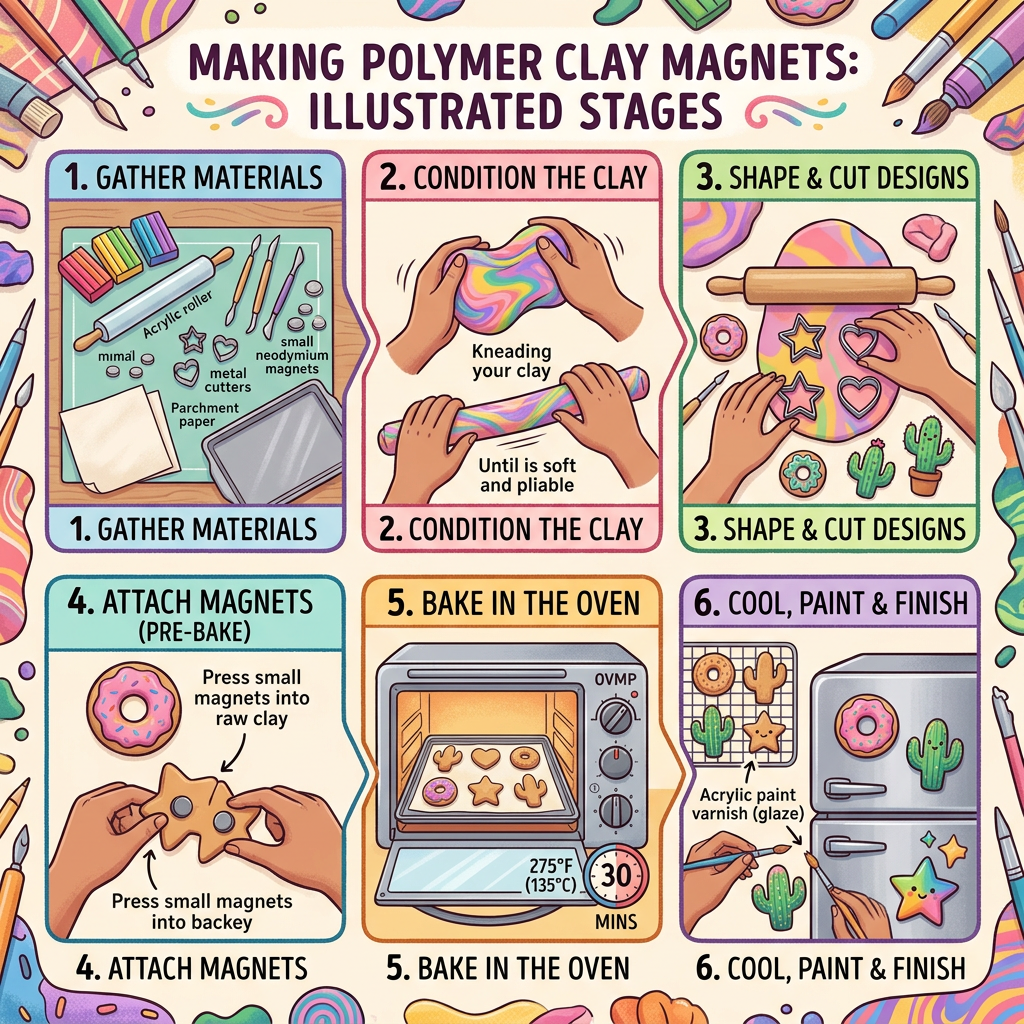
Making Your First Polymer Clay Magnets
Step 1: Condition Your Clay
Before you do anything else, you need to condition your clay. This means working it with your hands until it’s warm, soft, and pliable, no more cracking or crumbling. Think of it like waking the clay up.
Tear off a chunk about the size of a golf ball. Roll it into a snake, fold it over, roll it again. Repeat. For softer clays like Sculpey III, this might take two minutes. For firmer clays or clay that’s been sitting in cold storage, it might take five to ten. Your hands will be warm by the end and that’s exactly what you want.
Pro tip: If your clay is really stiff, try rolling it between your palms like a ball while you watch TV. The warmth does the work.
Step 2: Roll It Out
Once conditioned, roll your clay into an even sheet about 2–3mm thick. This is roughly the thickness of two pennies stacked together. You can use an acrylic roller on your tile surface, or run it through a pasta machine set to a medium setting.
Thinner = more delicate and likely to crack when baked. Thicker = sturdier but heavier. For magnets, 2–3mm is the sweet spot.
Step 3: Cut Your Shapes
This is where the fun starts. Use small cookie cutters, clay cutters, or a craft knife to cut your shapes. Some of my favorites for magnets:
- Simple geometric shapes (circles, squares, hexagons) — timeless and easy to decorate
- Food shapes (tiny pizzas, tacos, avocados) — endlessly charming
- Floral shapes — especially with a petal cutter set
- Letters or numbers — sweet for personalized gifts
- Freehand animals — takes a little practice but so worth it
Cut your shapes directly on your work tile so you don’t distort them by picking them up.
Step 4: Add Texture and Details
Here’s where polymer clay really shines. Press texture stamps into the surface of your cut shapes. Use a toothpick to draw fine lines or dots. Press a piece of lace over the clay and roll gently with your roller…when you peel it away, the lace pattern transfers perfectly.
You can also layer colors: roll thin snakes of a contrasting color and press them onto your shape, then blend the edges with your fingertip for an ombre effect. Or marble two colors together by twisting and rolling conditioned clays before cutting.
Small eyelet tools make dots. The eraser end of a pencil makes perfect circles. A skewer makes stars and starbursts. Your kitchen is full of texture tools — experiment!
Step 5: Bake
Place your pieces on a parchment-lined baking sheet (not the same one you use for food…designate a clay-only pan). Bake according to your clay’s package instructions. Sculpey III bakes at 275°F for 15 minutes per quarter inch of thickness. Most of my magnets bake for exactly 20 minutes.
Set a timer. Do not overbake. Overbaking causes burning and releases unpleasant fumes. If you start to smell something, pull them immediately.
Let the pieces cool completely on the pan before touching them. Polymer clay continues to cure as it cools — picking it up hot can warp thin pieces.
Step 6: Sand and Seal (Optional but Recommended)
Once cool, lightly sand the back of each piece with 400-grit sandpaper. This rough surface will help the glue bond much better when you attach your magnet.
Seal the front with Mod Podge (matte or gloss) or a UV resin topcoat. Two thin coats, letting each dry completely. This protects your design, prevents fingerprints, and gives the magnet a polished, professional finish.
Step 7: Attach the Magnet
Apply a small amount of E6000 adhesive to the flat face of a neodymium disc magnet. Press it firmly onto the back of your clay piece, centered. Hold for 30 seconds, then let it cure for at least 24 hours before testing on the fridge.
This step is important: use neodymium magnets, not craft magnets. The flat craft magnets that come in hobby store packs are weak. Neodymium disc magnets (N52 grade, 10mm diameter is my go-to) are small, powerful, and will actually hold a paper or two to your fridge. The difference is night and day.
Design Ideas to Get You Started
Stuck on what to make? Here are some themes that have worked beautifully for me:
For the kitchen: Mini food shapes such ascoffee cups, donuts, pizza slices, lemons, strawberries. Paint them with acrylic paints after baking and seal with resin for a glossy food-illustration look.
For the garden lover: Tiny succulents in terracotta pots, bees, mushrooms, daisy flowers. These work especially well in muted, earthy tones.
For kids: Their initial letters, rainbow shapes, stars and moons. Use bright primary colors straight from the package, no painting needed.
For a modern, minimalist look: Neutral clay colors (cream, terracotta, sage green, charcoal) with simple impressed geometric patterns. No paint, just the natural clay color with a matte sealer. These look genuinely stunning and very Pinterest-worthy.
Personalized gifts: Press someone’s initial or a tiny meaningful symbol like a musical note for a music teacher, a tiny book for a reader, a paintbrush for an artist. Polymer clay is one of the best gifting crafts because the personalization is built into the material itself.
Troubleshooting Common Problems
My clay is too sticky. It’s been over-conditioned or is too warm. Set it aside for 15 minutes to cool down, or add a small amount of fresh unconditioned clay to stiffen it up.
My clay cracked when baking. It wasn’t conditioned enough, or it was too thin. Make sure you’re conditioning thoroughly and maintaining that 2–3mm minimum thickness.
My pieces are browning or burning. Your oven runs hot. Use an oven thermometer to check the actual temperature and adjust accordingly.
My magnet fell off. E6000 needs a full 24-hour cure. Also, make sure you’re using it on a clean, sanded surface. Re-glue and clamp overnight.
My shapes look lumpy. Welcome to the club — this is completely normal at first. The fix is rolling more slowly and evenly, and getting a pasta machine if you plan to do this regularly. It changes the game.
My Favorite Amazon Finds for This Project
I’ll be honest — I’ve bought a lot of polymer clay supplies from Amazon and have strong opinions. Here are the specific products I keep reordering:
- Premo Sculpey Multipack — the color range is excellent and the clay is consistent every time
- Disc Magnets — strong enough to hold multiple papers without falling; the pack of 60 means you have plenty to experiment with
- Clay Cutter Set — teardrop, circle, square, flower, and leaf shapes all in one set; perfect magnet sizes
- Texture Stamps — beautiful geometric and botanical patterns
- E6000 Craft Adhesive — the only glue I trust for permanent magnet attachment
- Mod Podge Gloss — reliable, widely available, great finish
Final Thoughts
What I love most about polymer clay magnets is that they sit right at the intersection of accessible and impressive. You don’t need a studio, a kiln, or any prior art experience. You need an oven, a tile, a roller, and about an hour. The result is something genuinely beautiful and personal that people consistently mistake for something you bought at a boutique shop.
I’ve made sets for every person on my gift list in the past year. My mom cried when I gave her a set with tiny magnets shaped like her grandkids’ initials. My best friend uses hers to hold recipes on the fridge while she cooks. My neighbor offered me actual money for some, which I took as the highest compliment.
Start with one simple shape. Condition your clay slowly. Don’t skip the neodymium magnets. And come back and tell me what you made — I genuinely want to know. Happy crafting

(This post contains affiliate links. I earn a small commission if you purchase through my links, at no extra cost to you — and it helps me keep buying clay to test for you!)
Leave a Reply